Instructions |
  
|
Instructions |
|
1.Create a new report.
2.Add "mw6barcode.jar" to the report's Classpath.

3.Put an image item on the report.
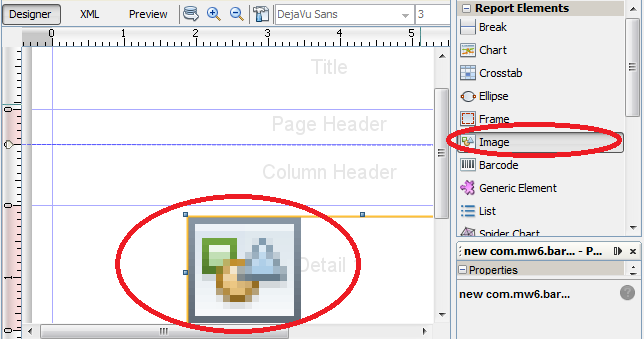
4.Click "Cancel" button for "Select an image file" window.
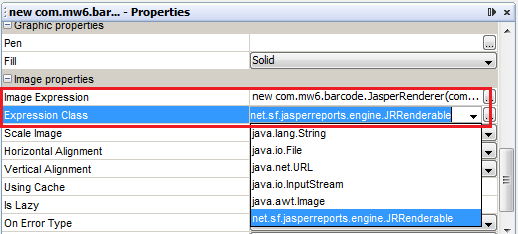
5.Edit the image item's properties by setting "Expression Class" to net.sf.jasperreports.engine.JRRenderable" and "Image Expression" to one of the following options:
•new com.mw6.barcode.JasperRenderer(com.mw6.barcode.ImageFactory.createBarcode(4, "1234", 0.07, 0, 96, 2.0, 12, true, true, true, 0, "", 0, 0, "png"))
•new com.mw6.barcode.JasperRenderer(com.mw6.barcode.ImageFactory.createPDF417("1234", 0.07, 0, 96, false, 0, 0, true, 0, 0, "png"))
•new com.mw6.barcode.JasperRenderer(com.mw6.barcode.ImageFactory.createDataMatrix("1234", 0.07, 0, 96, 0, 0, true, "png"))
•new com.mw6.barcode.JasperRenderer(com.mw6.barcode.ImageFactory.createAztec("1234", 0.07, 0, 96, 0, true, "png"))
•new com.mw6.barcode.JasperRenderer(com.mw6.barcode.ImageFactory.createQRCode("1234", 0.07, 0, 96, 0, 0, 0, "png"))
•new com.mw6.barcode.JasperRenderer(com.mw6.barcode.ImageFactory.createMaxiCode("1234", 0, 96, "", "", "", 2, true, "png"))
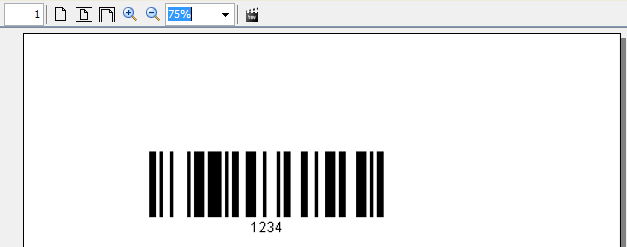
6.Preview the report.